Git basics
Git for beginners: learn the basics with a GUI, step by step
New to Git? Learn the five ideas that matter (repository, commit, branch, merge and remote), then build your first project in a free Git GUI: clone or create a repository, stage, commit, branch and push.
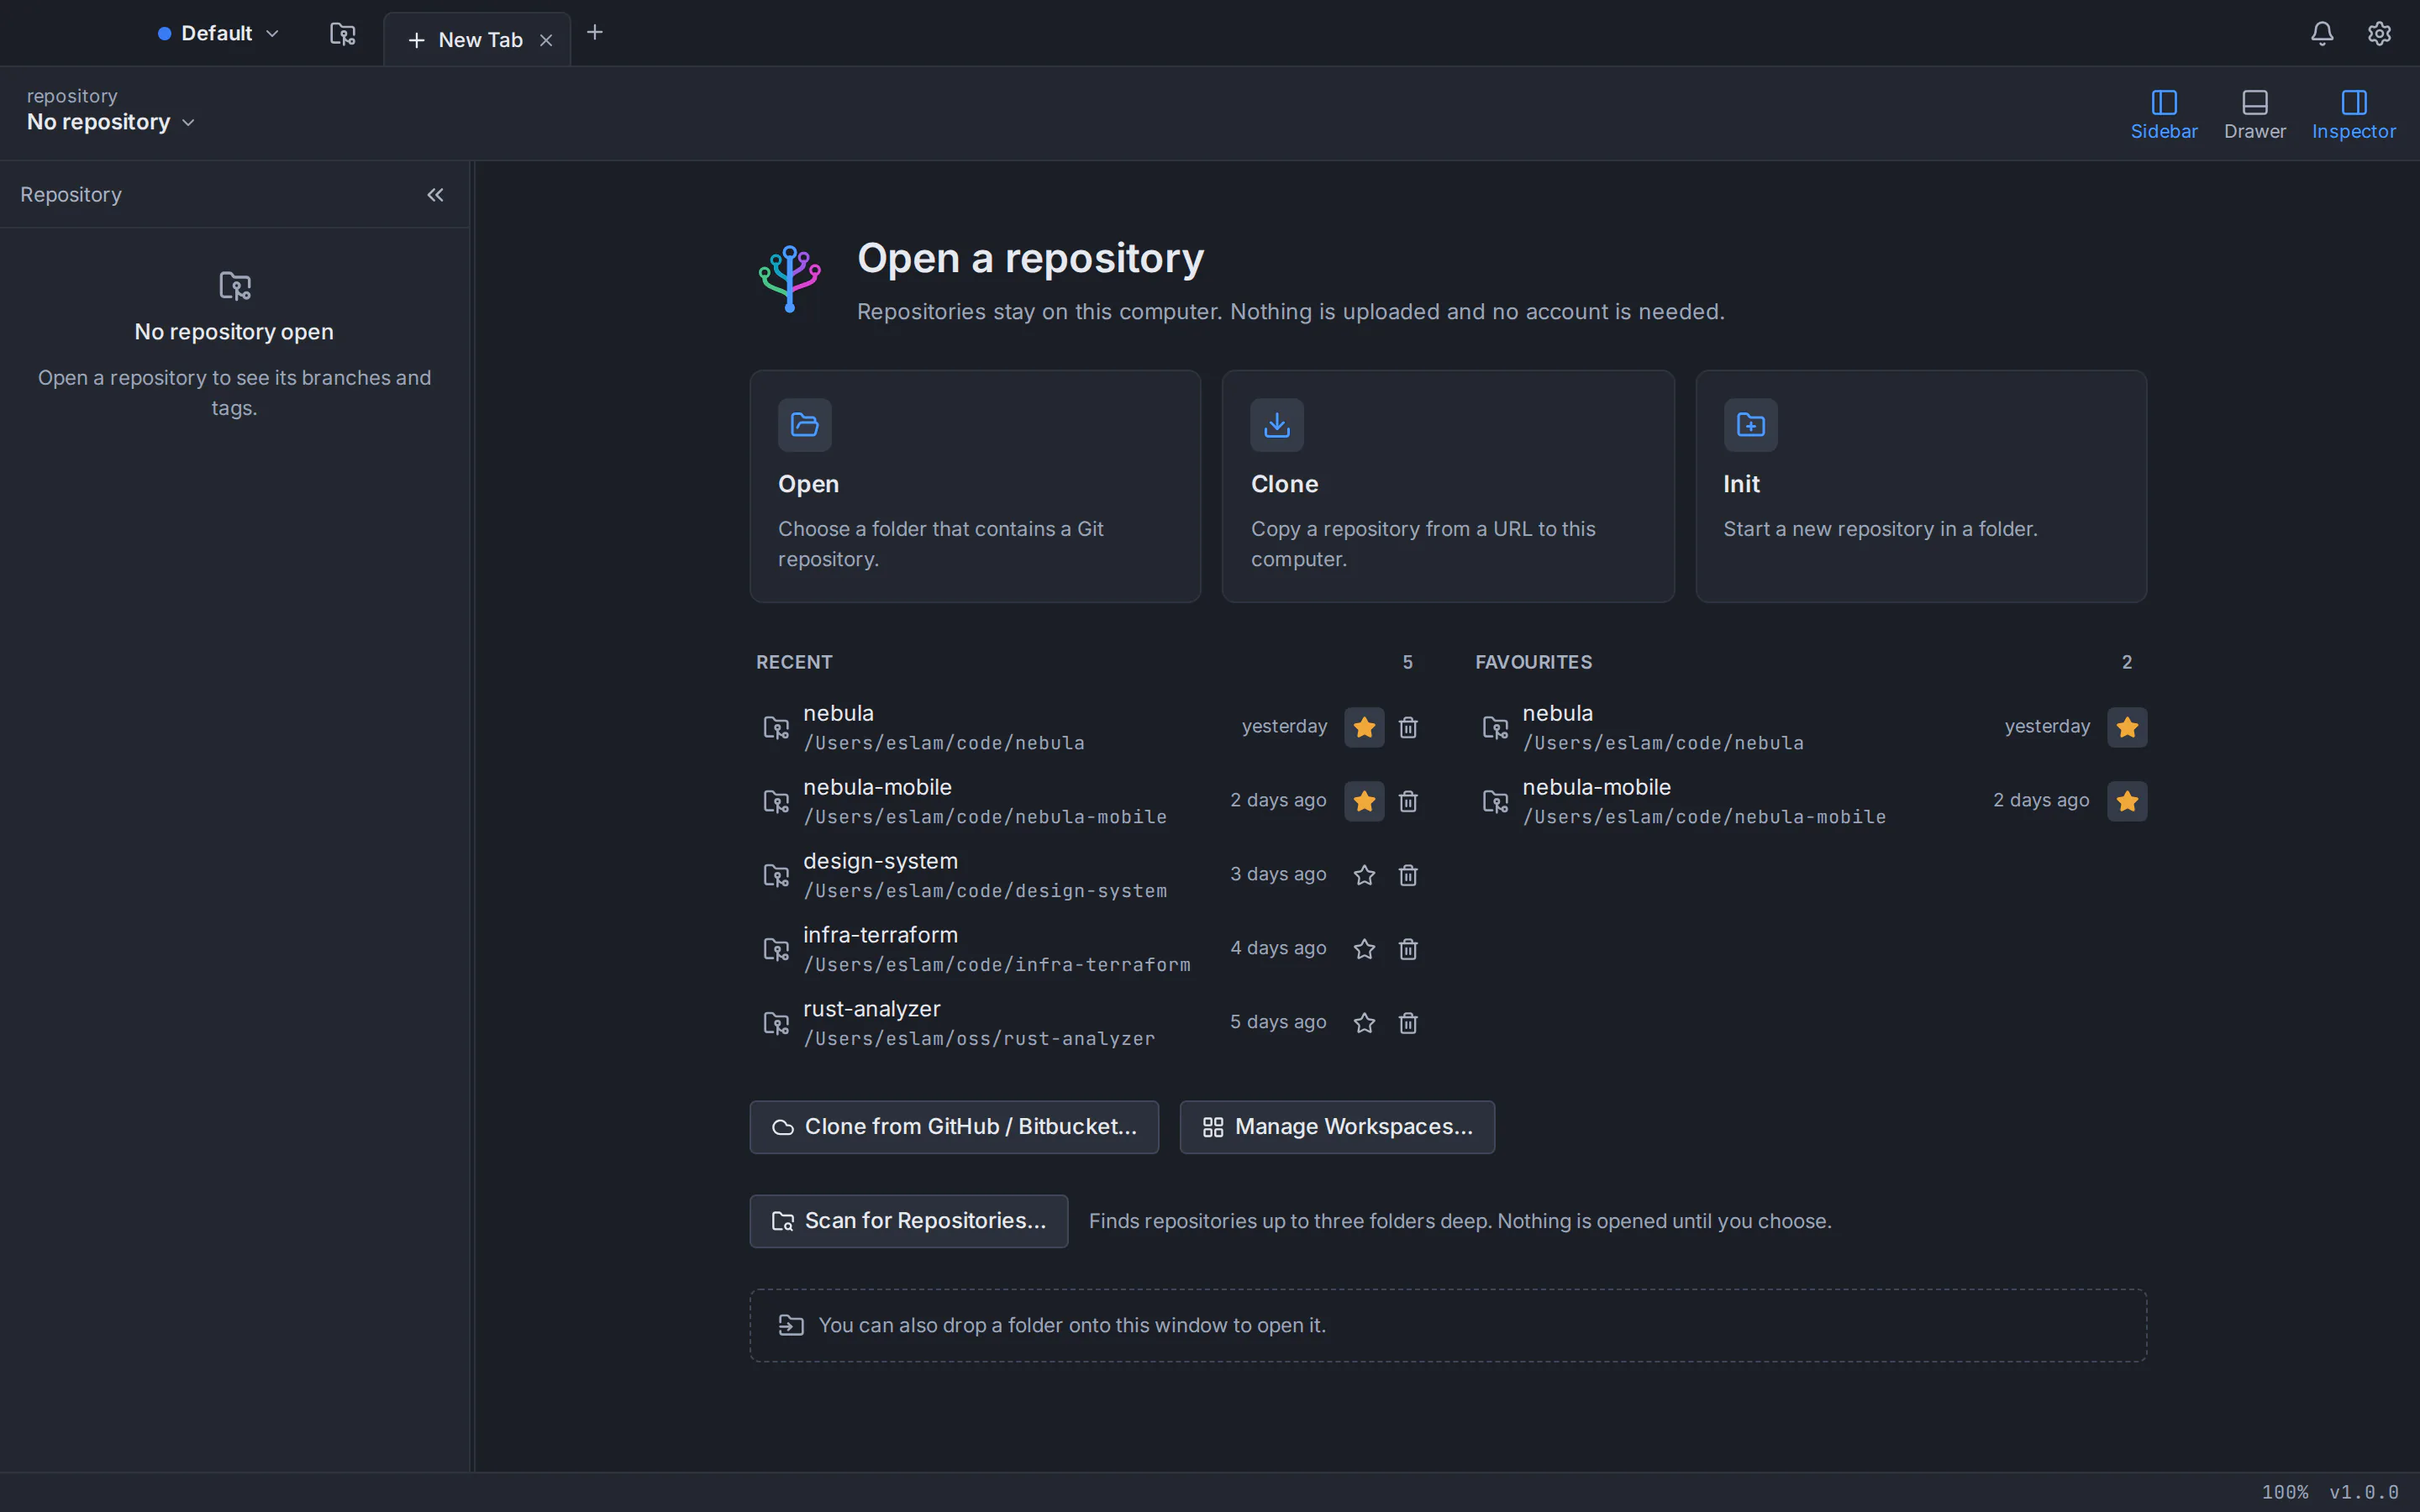
Git for beginners comes down to five ideas. A repository holds your project and its history, a commit is a saved snapshot of your files, a branch is a separate line of work, a merge joins two branches, and a remote is a copy of the repository on a server such as GitHub. Learn those five and every Git tutorial starts to make sense. A Git GUI helps because it draws them for you: each commit is a dot on a graph and each branch is a coloured line, so you see what is happening instead of picturing it.
This Git tutorial explains each idea in plain words, then walks through a first project in a GUI. The app in the screenshots is GitTree, a free Git client for macOS, Windows and Linux; its maker wrote this guide. Every step also shows the matching command, so what you learn works in the terminal and in any other Git tool.
What is Git? Version control in plain words
Git is a version control system: a program that records every change you save to a set of files, so you can see who changed what and when, compare any two versions and go back to an earlier one. Think of an unlimited undo history for a whole folder, where every saved point has a name and a note explaining why.
The Linux kernel developers, led by Linus Torvalds, created Git in 2005, and it works just as well for websites, documentation or a thesis as for code. Git is distributed: every copy of a repository carries the full history, so you can commit, browse history and create branches offline. You only need the network to share work.
One common mix-up: Git is the tool on your computer, while GitHub, GitLab and Bitbucket are websites that host Git repositories so teams can share them. Our guide to Git vs GitHub explains the difference in detail.
Git basics for beginners: the five ideas to learn first
1. Repository: your project plus its history
A repository (repo) is an ordinary project folder that Git tracks. Git keeps the history in a hidden .git folder inside it. Your files stay normal files: you edit them with any editor, and Git only steps in when you ask it to record or share something.
2. Commit: a saved snapshot with a message
A commit records the state of your files at one moment, together with your name, the date and a short message such as “Add contact form”. Each commit gets a unique ID called a hash (for example a1b2c3d) and points back to the commit before it, which is how Git builds a history you can read, compare and return to.
Before you commit, you stage the changes you want to include. The staging area lets you split work into tidy commits: fix a bug and rename a variable, then commit each change on its own, even when both sit in the same file.
3. Branch: a separate line of work
A branch is a name that points at a commit and moves forward every time you commit on it. Most repositories have a main branch, usually called main (older ones often use master). When you start something new, you create a branch such as feature/contact-page, commit there, and main stays untouched until the work is ready. Branches in Git are cheap: creating one takes an instant, so use them freely.
4. Merge: bringing work back together
A merge adds the commits from one branch to another, for example your feature branch into main. If main has not moved since you branched, Git simply moves it forward (a fast-forward); otherwise it creates a merge commit with two parents. When both sides changed the same lines, Git asks you to choose: a merge conflict. It is routine, and our guide to resolving Git merge conflicts shows how to handle one calmly.
5. Remote: a copy on a server
A remote is another copy of the repository, usually on a hosting service. The one you cloned from is named origin by default. You push to send your new commits to the remote, fetch to download commits others pushed, and pull to fetch and bring those commits into your current branch. Clone copies a remote repository, with its whole history, onto your computer.
Before you start: install Git and set your name
GitTree runs on top of the Git installed on your computer and does not bundle its own, so install Git first (version 2.39 or newer). That is also why every button in GitTree does what the matching command does. On macOS, run xcode-select --install or brew install git. On Windows, install Git for Windows from git-scm.com. On Linux, run sudo apt install git on Ubuntu 24.04 or Debian 12; Ubuntu 22.04 and Linux Mint 21 ship Git 2.34, which is too old, so upgrade Git on Ubuntu first. Then check the version in a terminal:
git --versionGit writes a name and an email into every commit, so set them once. Use the email of your GitHub, GitLab or Bitbucket account if you want commits linked to your profile there:
git config --global user.name "Your Name"
git config --global user.email "you@example.com"
You can also set them without the terminal: in GitTree’s Preferences, a profile holds a name and email for commits (handy for keeping work and personal identities apart), and each repository can have its own Name for commits and Email for commits.
Step 1: clone or create your first repository
Download GitTree, install it and sign in once with a free GitTree account, which you create on gittree.app with GitHub, GitLab, Bitbucket or Azure DevOps. The first launch needs the network; after that the app works offline for up to 7 days between checks. Every new tab opens on the start page, which offers three ways in: Open, Clone and Init.
Clone a repository that already exists
Choose Clone, paste the repository URL (HTTPS or SSH), pick a parent folder and check the Clones into path. Leave Open after cloning ticked and choose Clone. If you have connected a GitHub or Bitbucket account, Clone from GitHub / Bitbucket… lets you pick a repository from a list instead of copying its URL. The command does the same thing:
git clone https://github.com/your-name/your-project.git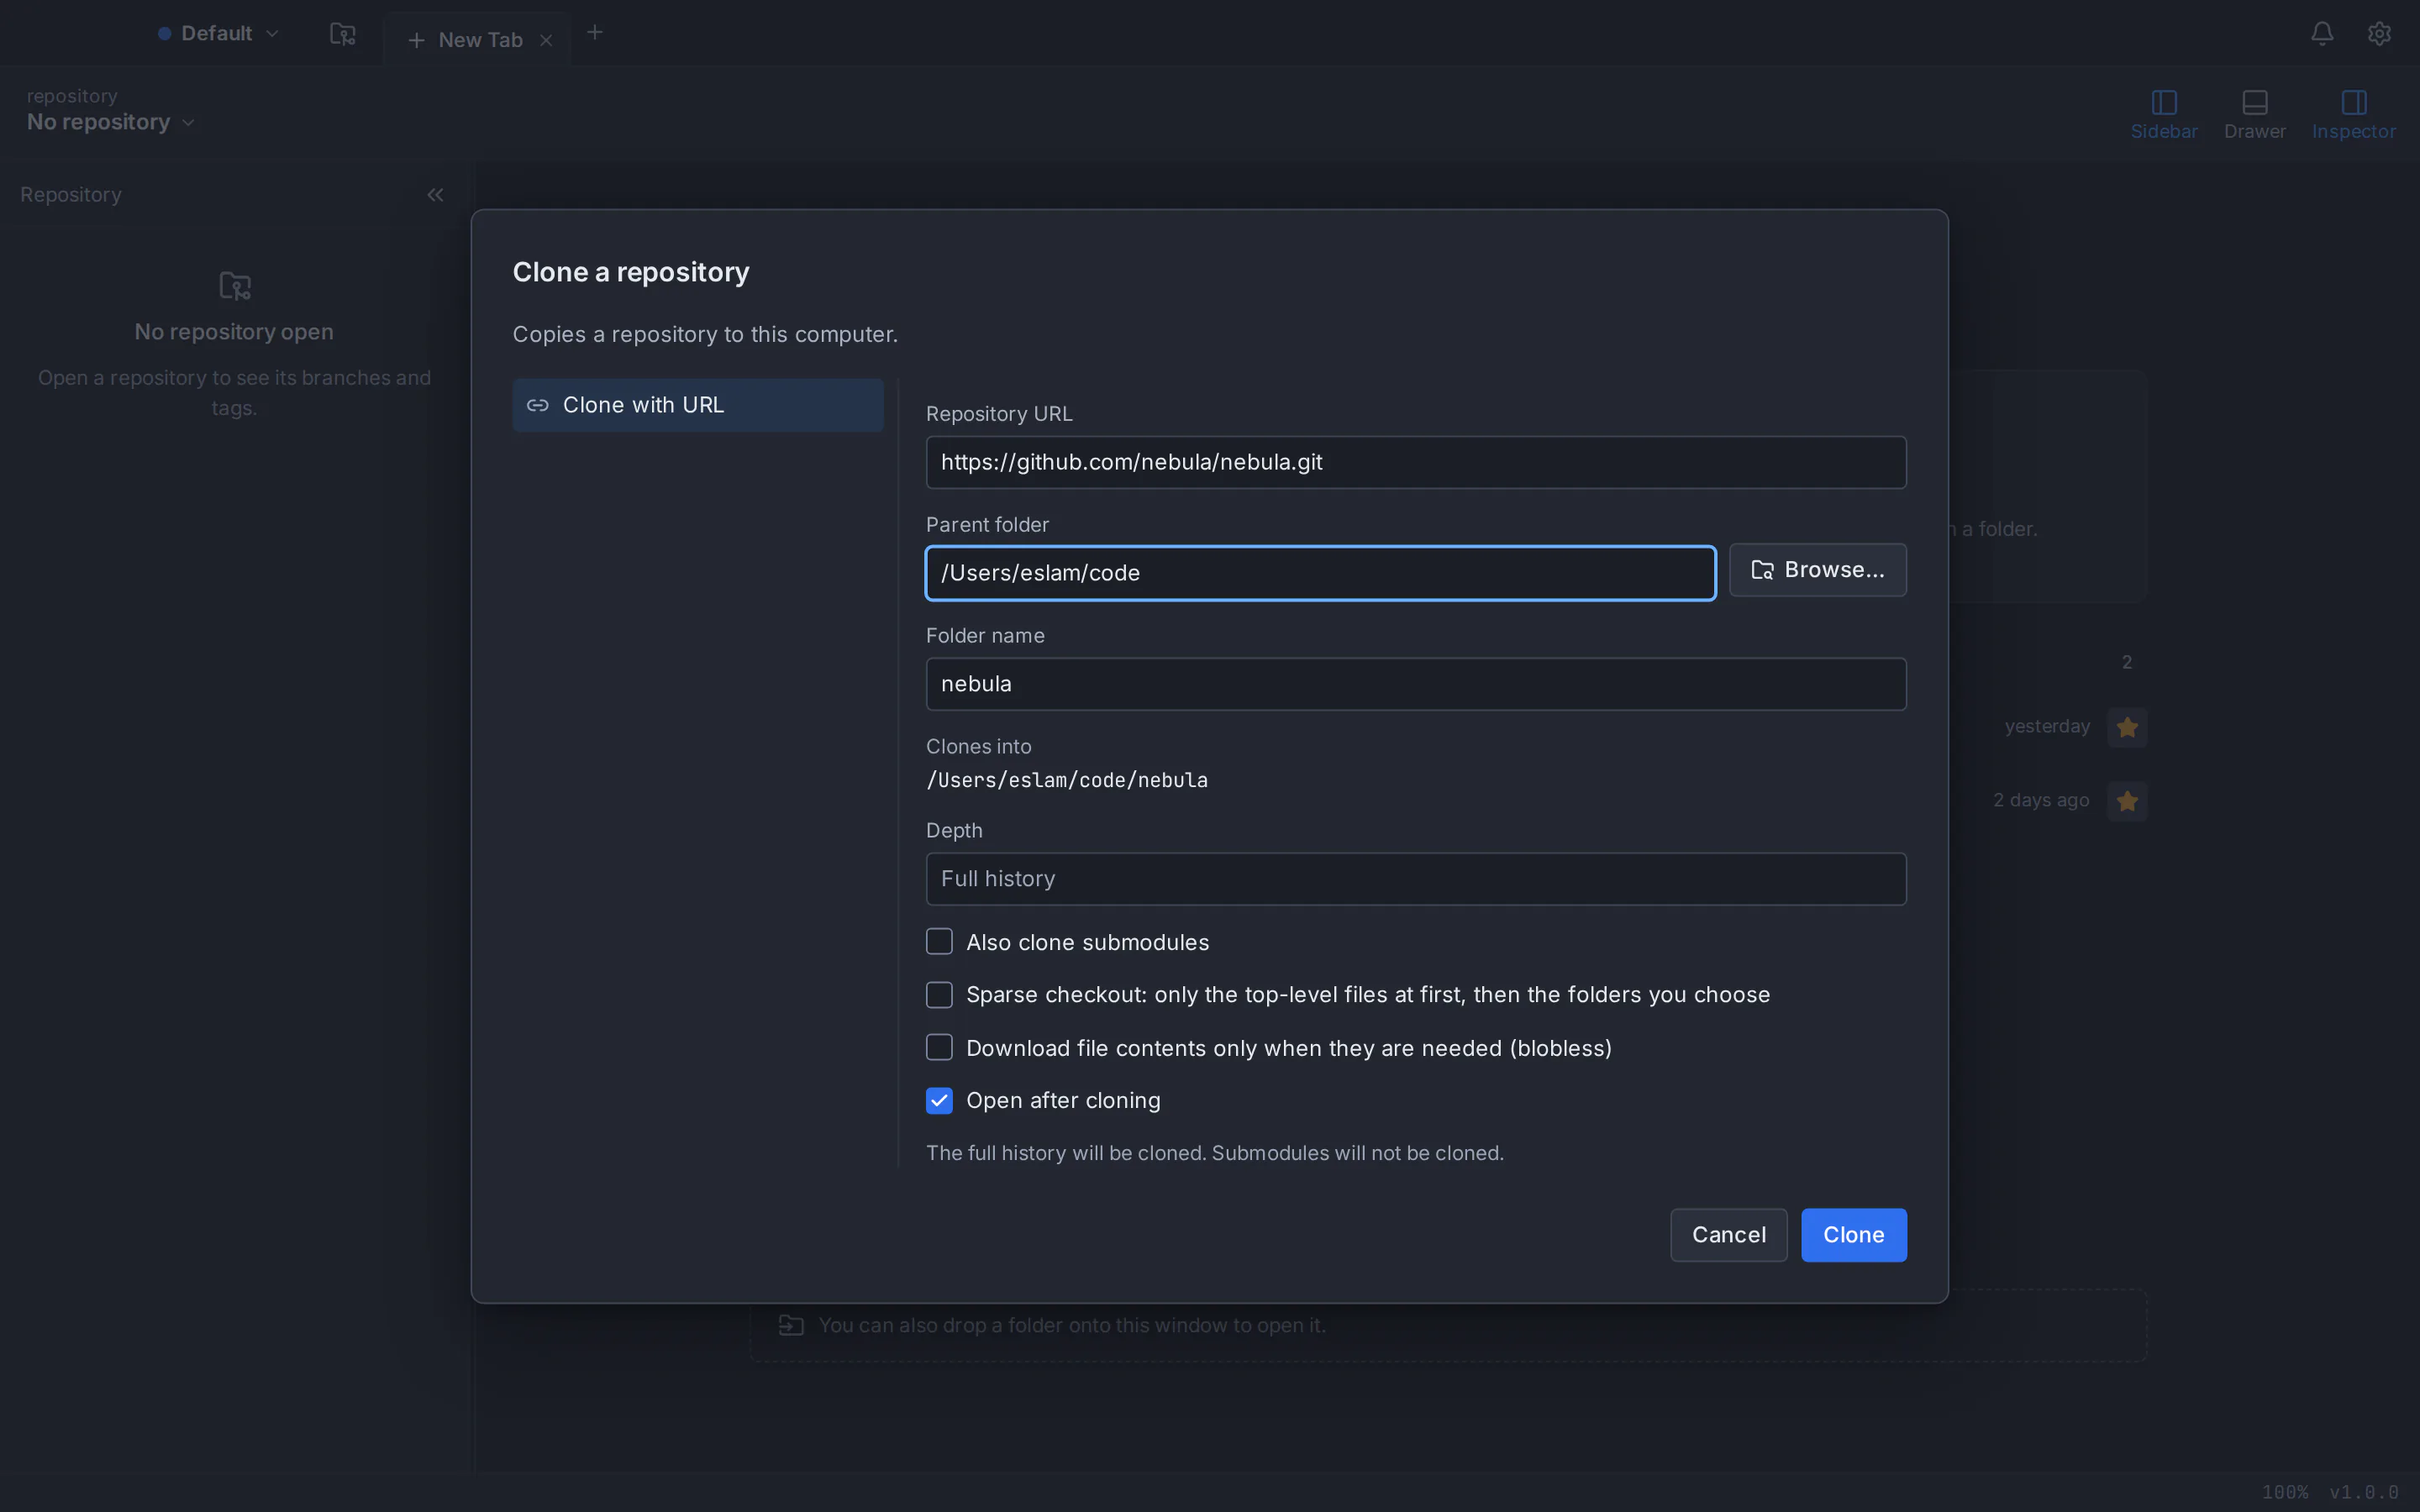
Or start a new repository with Init
To put an existing folder under version control, or start from scratch, choose Init. Pick the location, use main as the Initial branch, and optionally add a .gitignore template (so build output and dependencies stay out of Git) and a licence. Nothing is written until you choose Initialize. The command version:
git init -b mainStep 2: stage and commit your first change
Open the project in your editor and change something small: add a line to README.md, for example. Back in GitTree, a // WIP row appears above the newest commit on the graph, and the file shows up under Unstaged Files in the panel on the right.
- Stage the change. Choose Stage All Changes, or select one file and stage only that. To stage part of a file, open it and use Stage Hunk, or tick single lines and choose Stage Lines. Staged files move to Staged Files.
- Write a message. Type a short Summary of what the commit does, such as “Add project description to README”. A counter shows how close you are to 72 characters; longer summaries are often cut off in other tools. Add a Description if the reason is not obvious.
- Commit. Choose Commit Changes to 1 File (the count matches what you staged). The new commit appears at the top of the graph.
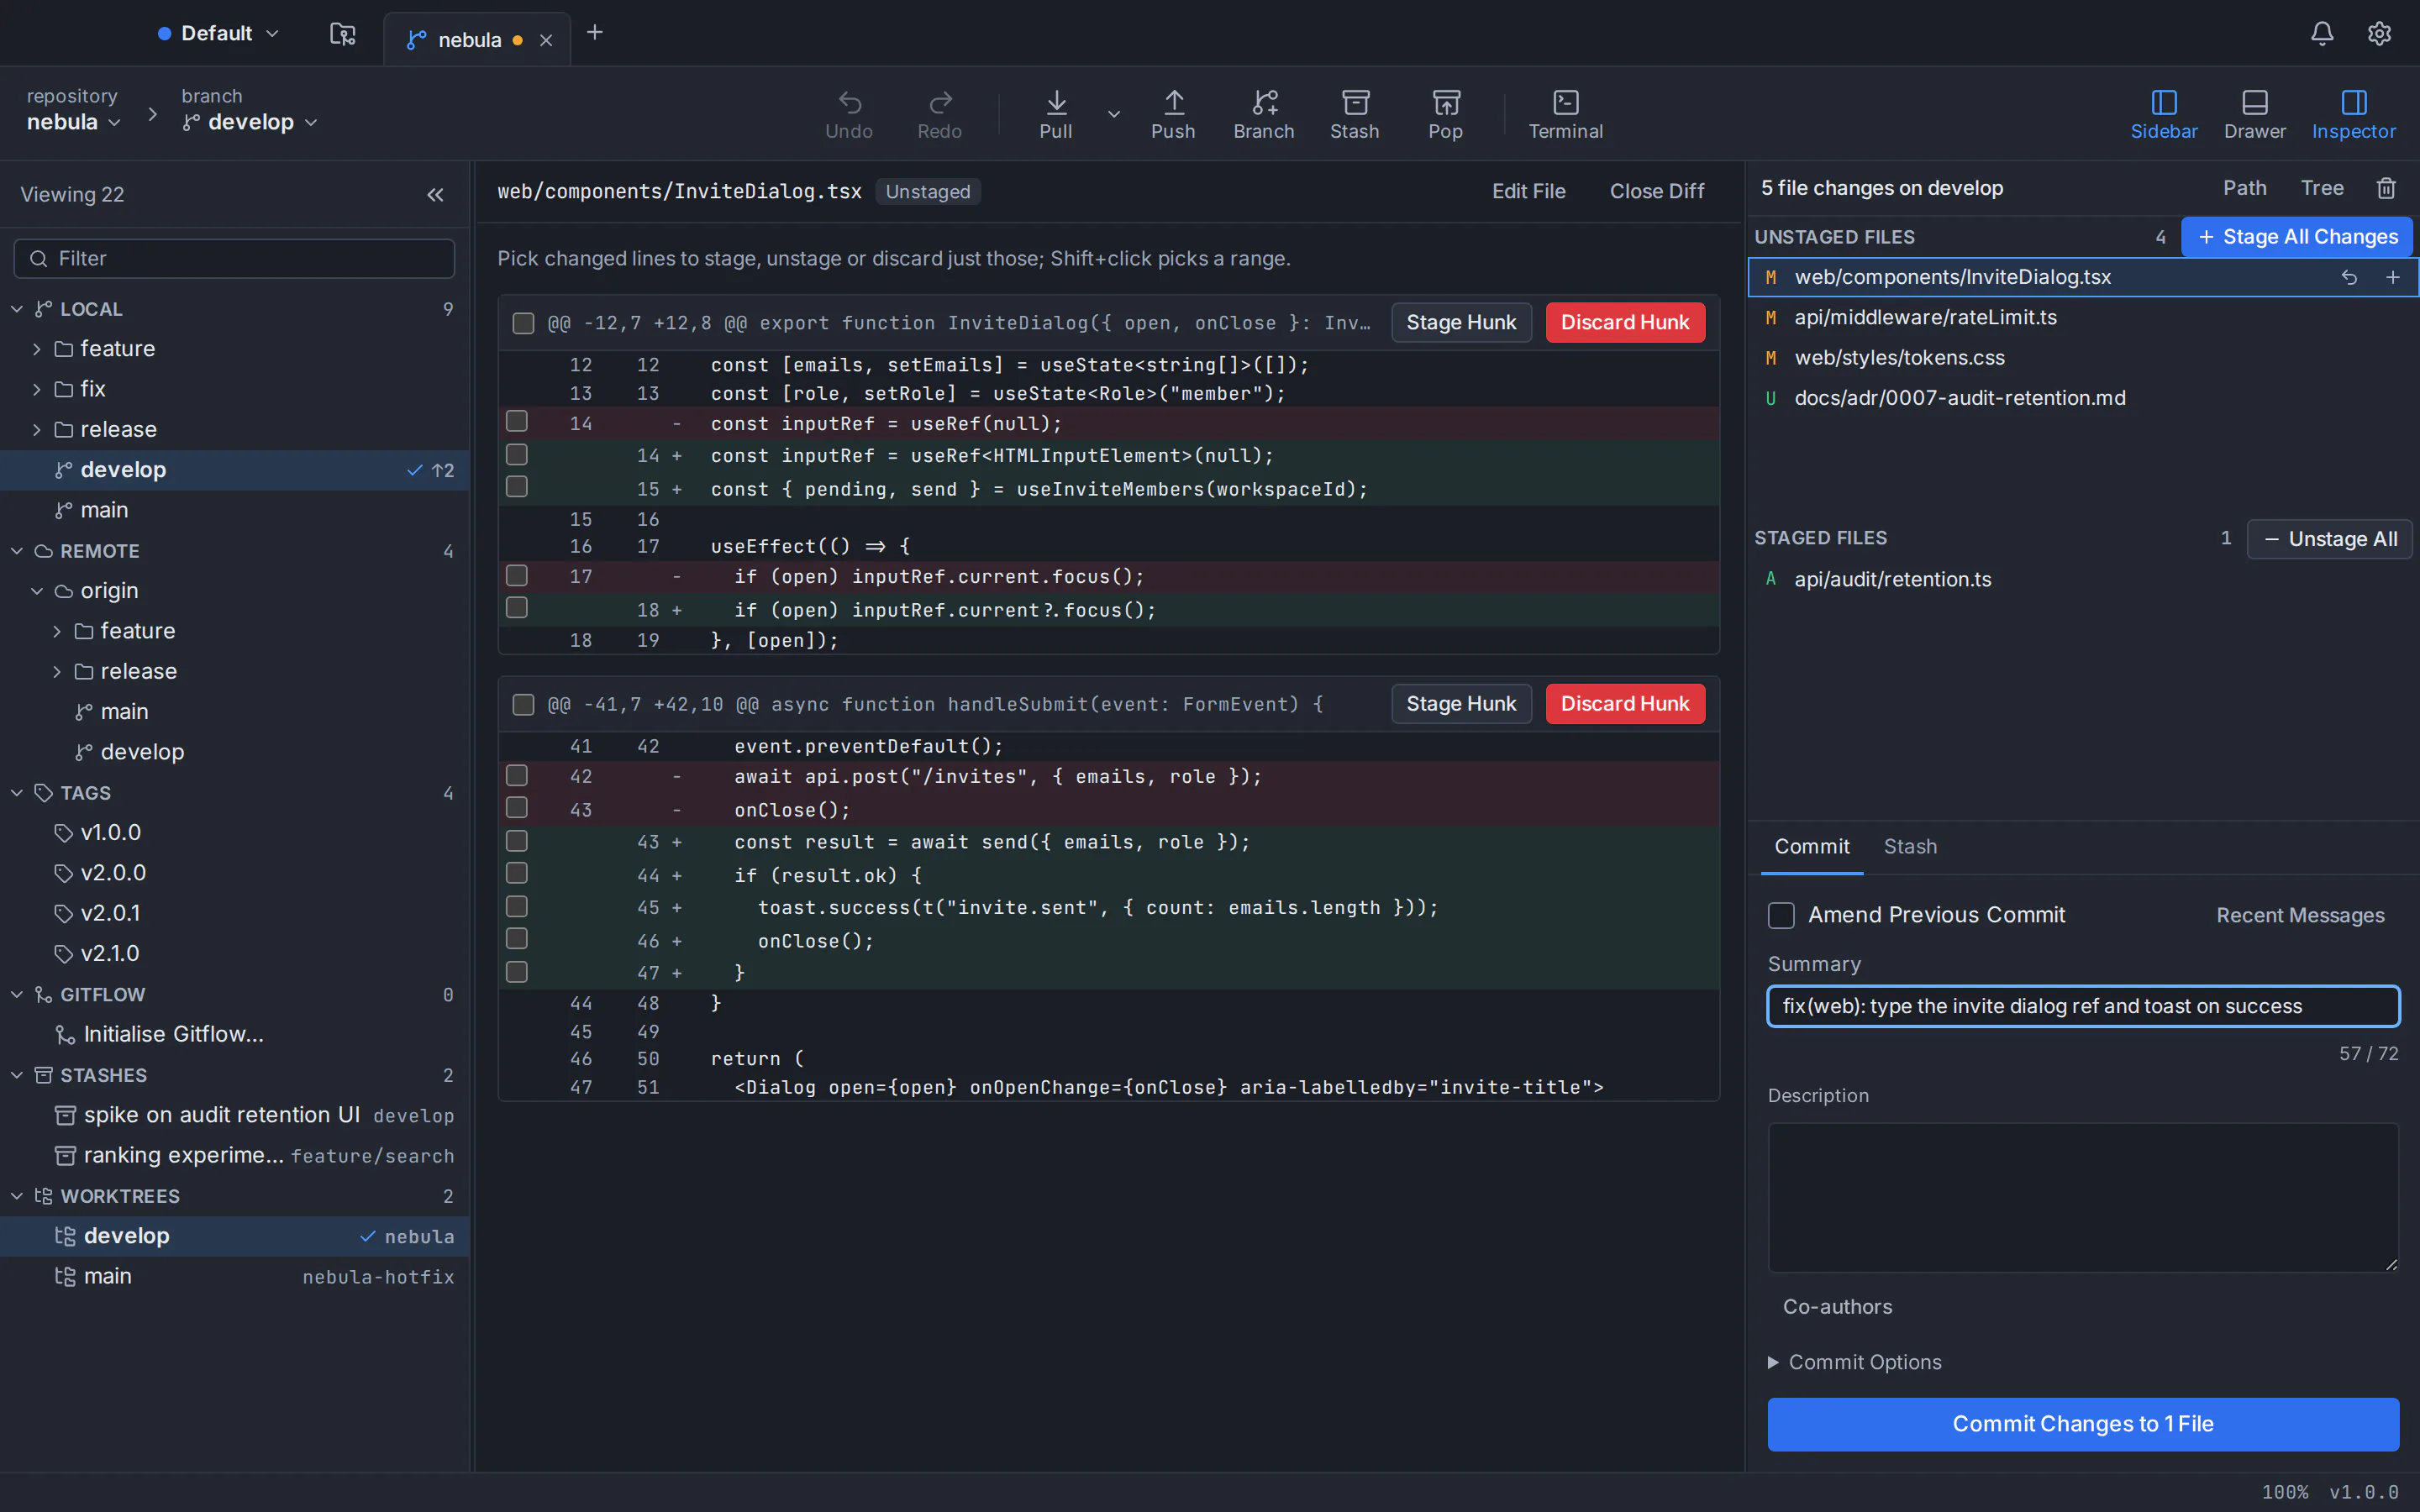
The same three steps on the command line:
git status
git add README.md
git commit -m "Add project description to README"
Good habits from day one: one logical change per commit, a summary that says what the commit does (“Fix login redirect”, not “stuff”), and committing often. Small commits are easier to review, explain and undo.
Step 3: create a branch, then merge it
Choose Branch in the toolbar, type a name such as feature/contact-page, make sure Check out the new branch is ticked and choose Create Branch. Make a commit or two the same way as before. The graph now shows your branch label moving ahead of main; when both branches have new commits, each gets its own coloured lane.
git switch -c feature/contact-pageWhen the work is ready, bring it back into main. Double-click main in the sidebar to check it out, then right-click your feature branch and choose Merge feature/contact-page into main. You can also drag the branch label onto main and pick the merge from the menu. The commands:
git switch main
git merge feature/contact-page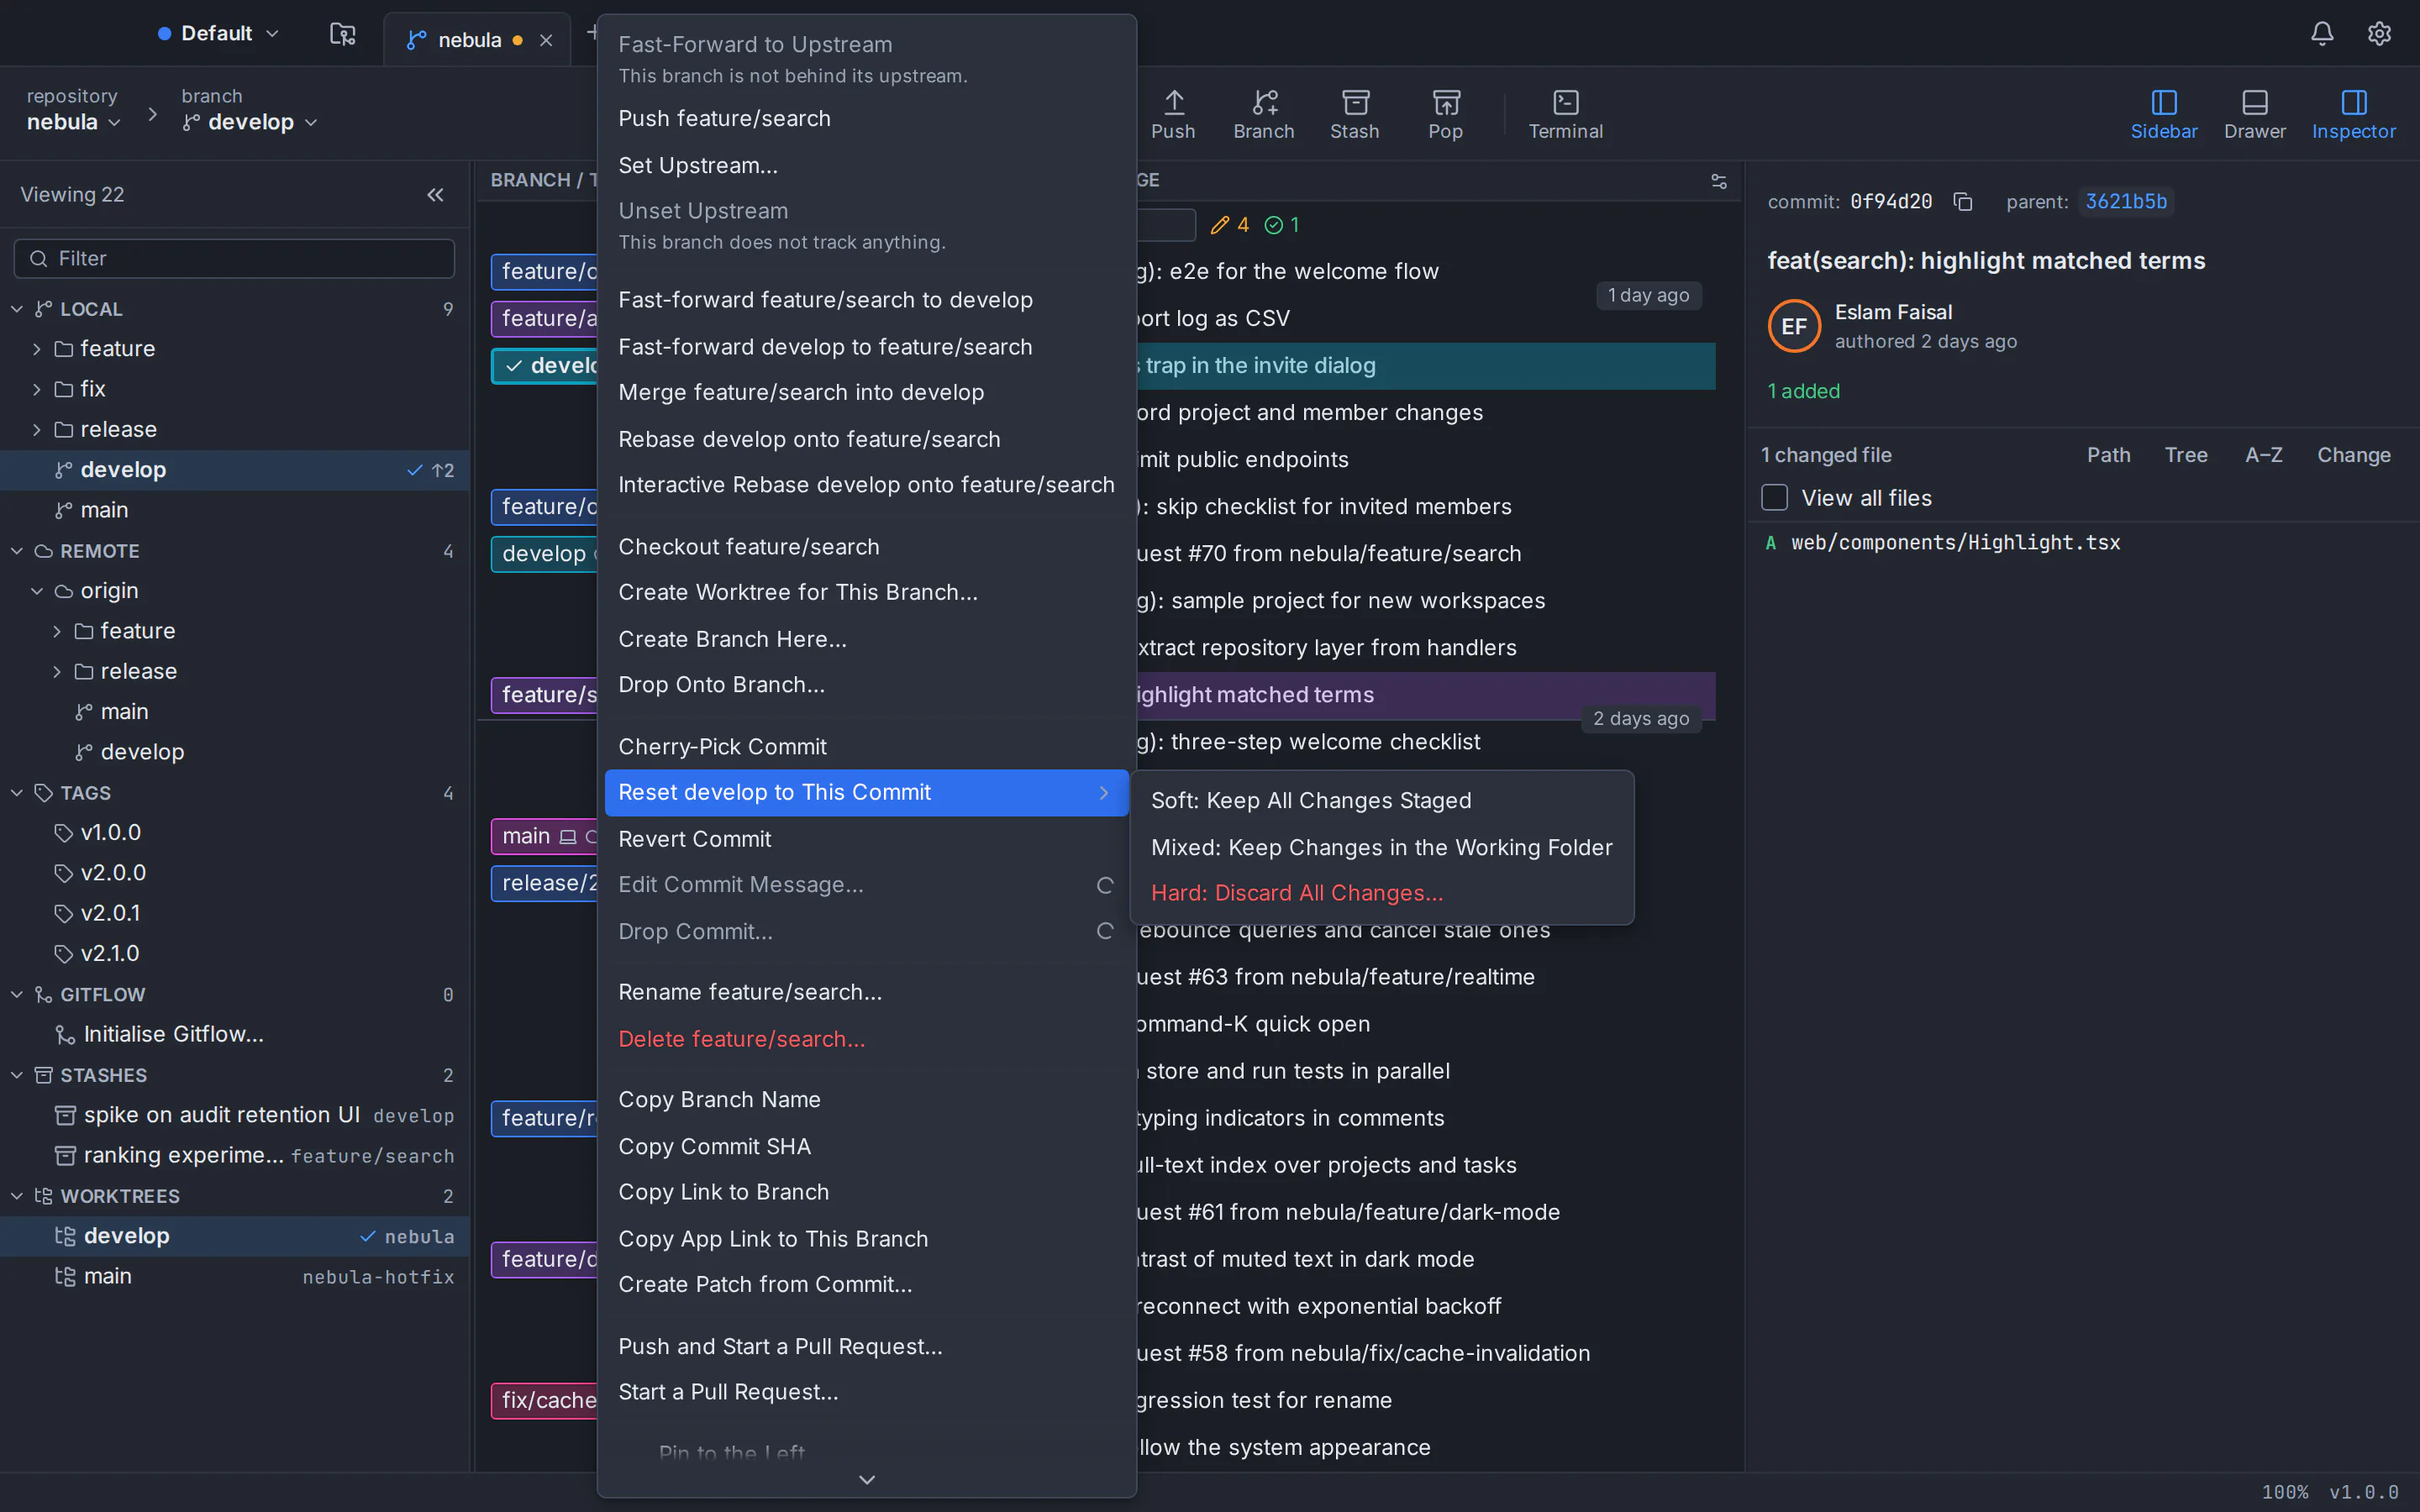
Step 4: push your work to GitHub or another remote
If you cloned the repository, it already has a remote called origin: choose Push in the toolbar. The first push of a new branch also sets its upstream, so later pushes and pulls know where to go. To push every time, open Commit Options and turn on Push After Commit.
A repository you created with Init has no remote yet. Run Publish Repository… from the command palette (⌘+Shift+P on a Mac, Ctrl+Shift+P on Windows and Linux): it creates the repository on your connected GitHub, GitLab, Bitbucket or Azure DevOps account, adds it as a remote and pushes the branch. See how to push a project to GitHub without the command line for every step. On the command line, after creating an empty repository on the website:
git remote add origin https://github.com/your-name/your-project.git
git push -u origin main
To get commits your teammates pushed, choose Pull; GitTree also fetches in the background, so new remote commits show on the graph first. If the remote asks who you are, connect your hosting account in GitTree, or generate an SSH key in the app and upload it to GitHub, GitLab or Bitbucket.
Your first Git project in GitTree: the short version
Install Git and GitTree
Install Git 2.39 or newer, set your name and email, then download GitTree and sign in once.
Clone or create a repository
On the start page, choose Clone and paste a repository URL, or choose Init to start a new repository in a folder.
Stage a change
Edit a file, then choose Stage All Changes, or stage single files, hunks or lines.
Commit it
Type a short summary of what changed and choose the commit button.
Work on a branch and merge it
Choose Branch to create a branch and commit there, then check out
main, right-click the branch and choose Merge.Push to the remote
Choose Push. For a repository you created with Init, run Publish Repository… from the command palette first.
Git glossary for beginners
Keep this table open while you learn Git. Each row gives a term, what it means and where you find it in GitTree.
| Term | What it means | In GitTree |
|---|---|---|
| Repository (repo) | A project folder whose history Git tracks in a hidden .git folder. | A tab; Open, Clone or Init on the start page. |
| Working folder | The files you see and edit on disk. | The // WIP row and Unstaged Files. |
| Staging area (index) | The changes you picked for the next commit. | Staged Files. |
| Commit | A saved snapshot of staged changes, with a message, author and date. | A dot on the commit graph. |
| Hash (SHA) | The unique ID of a commit, such as a1b2c3d. | Copy Commit SHA. |
| Branch | A name that points at a commit and moves forward as you commit. | Labels on the graph and in the sidebar. |
| HEAD | What you have checked out right now, usually a branch. | The branch picker in the toolbar. |
| Checkout (switch) | Moving your working folder to another branch or commit. | Double-click a branch label. |
| Merge | Adding another branch’s commits to the current branch. | Right-click a branch, or drag it onto another. |
| Merge conflict | Both branches changed the same lines, so Git asks you to choose. | A three-way conflict editor. |
Remote (origin) | A copy of the repository on a server; origin is the one you cloned from. | The Remote section of the sidebar. |
| Clone | Copying a remote repository, with its history, to your computer. | Clone on the start page. |
| Push | Sending your new commits to the remote. | The Push button. |
| Fetch / pull | Fetch downloads new commits; pull also brings them into your branch. | The Pull button. |
.gitignore | A file listing paths Git should not track, such as build output. | Ignore This File on a changed file. |
| Stash | Changes put aside without committing, to bring back later. | The Stash and Pop buttons. |
How to keep learning Git after your first project
The loop you just practised (edit, stage, commit, push, and a branch for anything bigger than a quick fix) covers most days with Git. When you are ready for more, learn one new idea at a time:
- Read history. Learn to follow lanes, forks and merges with a Git tree visualizer.
- Undo safely. Most mistakes are recoverable; see how to undo a reset, rebase or commit.
- Tidy commits before sharing. An interactive rebase in a GUI lets you squash, reword and reorder commits by dragging them.
- Learn the commands too. GitTree’s built-in terminal sits under the graph, so you can type a command and watch the graph change. Our comparison of a Git GUI and the command line explains when each one wins.
GitTree is free today, private repositories included. See everything it can do, or read the install notes for Mac, Windows and Linux.
Frequently asked questions
What is Git, in simple terms?
Git is a version control system: a program that records every saved change to the files in a project folder. You can see who changed what and when, compare versions, go back to an earlier state, and work on several ideas at once in branches. It runs on your own computer and works offline; you only need the network to share commits.
Is Git hard to learn for beginners?
The everyday part of Git is small: stage, commit, branch, merge, push and pull. Many beginners are comfortable with it after an afternoon of practice. What feels hard at first is picturing branches and history, which is where a Git GUI helps, because it draws every commit and branch on a graph. Advanced commands such as rebase can wait until you need them.
Should I learn Git with a GUI or the command line first?
Either works, and the best path for many beginners combines both. A GUI shows what each action does to the commit graph, so the ideas sink in faster. The command line teaches the exact vocabulary used in documentation and on servers. Using a GUI that runs real Git commands, while trying the matching commands in a terminal, builds both skills.
What is the difference between Git and GitHub?
Git is the version control tool that runs on your computer and stores the history of your project. GitHub is a website that hosts Git repositories online so people can share code, review changes and collaborate. GitLab and Bitbucket are similar services. You can use Git without any of them, and you push to them when you want a copy online.
What is the difference between staging and committing in Git?
Staging picks which changes go into the next commit; committing saves those staged changes permanently into the history with a message. Changes you do not stage stay in your working folder, untouched. The split lets you turn a messy afternoon of edits into several clean commits, each with one clear purpose, even when the changes sit in the same file.
Do I need a GitHub account to use Git?
No. Git works entirely on your computer: you can create a repository, commit, branch and merge without any account. You need a hosting account on GitHub, GitLab, Bitbucket or a similar service only when you want to back up your work online or collaborate. GitTree itself needs a free GitTree account, which you create with a GitHub, GitLab, Bitbucket or Azure DevOps account.
Is GitTree free for beginners, and what do I need to run it?
GitTree is free today for individuals and organizations, private repositories included, with no paid plan. It runs on macOS 13 or later, 64-bit Windows 10 and 11, and 64-bit Linux (Ubuntu and Debian). You need Git 2.39 or newer installed and a free GitTree account; the first launch needs the network, then it works offline for up to 7 days.
Sources
Claims about other products were checked against their official pages on October 6, 2026. Prices and features change; the vendors’ pages are the source of truth.
- Pro Git: What is Git?
- Pro Git: A Short History of Git
- Pro Git: First-Time Git Setup
- Pro Git: Getting a Git Repository
- Pro Git: Recording Changes to the Repository
- Pro Git: Branches in a Nutshell
- Pro Git: Basic Branching and Merging
- Pro Git: Working with Remotes
- Git documentation: git-init (initial branch name)
- Git documentation: git-switch
- Git documentation: gitglossary
- Git downloads